

Post by jaypee on May 28, 2017 19:15:31 GMT -5
About seven years ago when I wrote "Decoding the FEG Hi Power" I had tried fitting a BHP ambi safety to my PJK-9HP, but found that the left side frame hole in the FEG was a skosh too small for the larger diameter shaft on the left end of the BHP safety shaft. Frankly, I stood down on it because, not being a machinist, I had no idea how make the BHP unit fit the smaller hole. Well bee gory, I got over my timidity and fitted one right up to my newest PJK-9HP and it passed all the function checks including the click test. Here's what I did.
The left end of the BHP unit's safety shaft almost started into the left side hole but bound up tight immediately. So I locked the safety shaft into a padded vise and cut a piece of 400 wet or dry sandpaper about 1/8" wide by 4" long, oiled it liberally along with oiling the larger diameter left side of the shaft I was going to work on. I then did the shoeshine stroke with the paper 50 times nice and carefully. Then I rotated the shaft in the vise 180 degrees and repeated this process with new paper and oil. After the second 50 careful strokes I gave it a try and darn if the shaft didn't pop right into the left side hole and worked just smooth as heck.
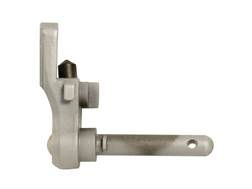
Here is the left side safety lever. The large diameter shaft at the end of the smaller shaft is the one I worked on. Mine was blued but this one shows a lot better in the photo.
I know another couple of guys who did this using emery paper, but I thought the Emery paper might be too rough - both reported having to polish the shaft after working it down to fit. With the oiled 400 grit paper there was no polishing necessary. It worked perfectly.
I wouldn't hesitate to try to install a BHP safety on a FEG PJK-9HP again. It's a pretty easy job providing all the other parts in the assembly are still in good working order. But the proof is in the function test when the job is done. I'd hang on to the FEG safety just in case something doesn't match up right and the new installation fails the function test. This gun had a round count of about 250 rounds, so I really can't predict how the installation would go on a well worn gun, and I'll leave myself a little wiggle room here.
JayPee
__________________
The left end of the BHP unit's safety shaft almost started into the left side hole but bound up tight immediately. So I locked the safety shaft into a padded vise and cut a piece of 400 wet or dry sandpaper about 1/8" wide by 4" long, oiled it liberally along with oiling the larger diameter left side of the shaft I was going to work on. I then did the shoeshine stroke with the paper 50 times nice and carefully. Then I rotated the shaft in the vise 180 degrees and repeated this process with new paper and oil. After the second 50 careful strokes I gave it a try and darn if the shaft didn't pop right into the left side hole and worked just smooth as heck.
Here is the left side safety lever. The large diameter shaft at the end of the smaller shaft is the one I worked on. Mine was blued but this one shows a lot better in the photo.

I know another couple of guys who did this using emery paper, but I thought the Emery paper might be too rough - both reported having to polish the shaft after working it down to fit. With the oiled 400 grit paper there was no polishing necessary. It worked perfectly.
I wouldn't hesitate to try to install a BHP safety on a FEG PJK-9HP again. It's a pretty easy job providing all the other parts in the assembly are still in good working order. But the proof is in the function test when the job is done. I'd hang on to the FEG safety just in case something doesn't match up right and the new installation fails the function test. This gun had a round count of about 250 rounds, so I really can't predict how the installation would go on a well worn gun, and I'll leave myself a little wiggle room here.
JayPee
__________________


